Showing posts with label DIY. Show all posts

Sunday, September 13, 2009

Frutezia cupcakes

Because I "don't" have enough things to do when I'm bored (says the girl who has two perspective drawings to do).
After shopping around with a friend of mine, I found this delightful gift set:
Instant love for this!

and bought it immediately. It's a fully equipped set for the beginning cupcake cook (like me) with: a silicon 4-cup tray, a piping bag, four different nozzles and a small 48 page cookbook. Curiosity begged me to try it out ASAP as the beautiful pictures captivated my imagination. Since my boyfriend's roommate has an overstock of a particular light wine that no one likes, I decided to use it in the culinary pursuit of alcoholic cupcakes.

Vineyard Blend Frutezia(c) Cupcakes
(referenced here is "Cupcake Creations" by Hinkler Books)
Ingredients:
-1 egg
-1/3 cup sugar
-1/3 cup of butter, softened
-1/6 cup of milk (fill half a 1/3 cup)
-1/2 cup of self rising flour, sifted
-2/3 tbsp of Vineyard Blend Frutezia Wine*

Topping
-1/3 cup of icing sugar (note: since I had none, I used regular sugar, it will be grainy, but just as delicious)
-1/3 cup of butter, softened.
-1/2 tbsp of Vineyard Blend Frutezia Wine
-Cinnamon sugar (found in your local supermarket's spice aisle)

Preheat the oven to 320° F. Line the cupcake tray with non-stick spray.

In a small bowl, lightly beat the egg, add the butter and sugar, then mix until light and fluffy. Add the milk, flour and Frutezia and stir to combine. Whisk until the consistency is light and creamy. If you like, add a few drops of food coloring to make a bigger visual impact.

Divide the mixture evenly between each hole (about 3/4 of the way up, to leave space for their expansion). Bake for 15-18 minutes until risen and firm to the touch.

Allow the cupcakes to cool down and rest on a wire rack until they are ready for the frosting.
They look naked don't they?

While the mini cakes are cooling down, combine the sugar, butter and wine with a spoon (wooden recommended) until well mixed, then whisk until light and fluffy. Spoon mixture into a piping bag with a medium star nozzle (I used a simple Ziplock bag with a corner cut) and set aside until said cakes are cool enough to avoid melting.

When done cooling, pipe the icing onto the cupcakes and sprinkle on some cinnamon sugar to finish. Do enjoy with a cold glass of milk or wine!

Makes 4

*NOTE: The wine used can be replaced with your favorite liquor, just be careful with its strength as it might easily overpower the sweetness in the cupcake.

Saturday, August 8, 2009

Karaage with steamed rice
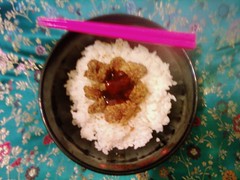

Karaage with steam rice
Originally uploaded by bunnyq.lita

A quick, easy and incredibly tasty way to finish up any leftover raw chicken.

Karaage is Japanese-style chicken nuggets, usually served with lemon and eaten all year long and a good bento standby.

The recipe used is from "The Manga Cookbook" by Yoko Ishihara

Karaage
1 lb of boneless chicken thighs
1 1/2 cups of cornstarch/cornflour (or enough to coat the chicken)
1 lemon
1 cup of vegetable oil (or enough to cover the chicken)

For the marinade
1/2 cup of soy sauce
1 tsp of freshly grated ginger
2 cloves of garlic (or 1 tsp of garlic paste)

Steamed Rice
1 1/2 cups of medium grain rice
2 cups of water
1 tbsp of vegetable oil
salt for taste

Place the garlic, ginger and soy sauce in a container with lid to make the marinade for the chicken.

Cut said poultry into bite-sized portions and toss them inside the CLOSED container (unless you want to clean up soy from your kitchen and clothes). Let it sit in the refrigerator for 30 minutes.

While the chicken marinades, start boiling the water with the rice, oil and salt for about 20 minutes, making sure to move it along to speed up and completely cook it.

Transfer the chicken into a ziplock bag with the cornstarch (or another container) and shake until the chicken is throuroughly covered.

Heat up the oil in a large pot (I use a wok for my frying) on medium heat and slowly add the chicken. Fry until it's golden brown. Remove from pot and place on paper towels to drain the oil.

Cut the lemon and squirt the juice on top of the chicken to finish!
Note: You can skip the lemon all together, as I did. It will be just as delicious!

Chicken Karaage on Foodista

Wednesday, July 8, 2009

DIY Malasadas//Pancake Puffs

Ever been to Denny's recently? Their pancake puppies are probably my favorite thing on the menu. I figured I could surprise my boyfriend when he came over for dinner (detailed on another post). Ever since then, I’ve been making up new ways to make these convenient snacks more delectable than the last batch.

DIY pancake pups*
Makes 10 puffs **
1/2 cup of preferred pancake mix (I used Buttermilk)
1/3 cup of milk
1/4 cup of all purpose flour
1/4 tsp of vanilla extract
3/4 cup of vegetable oil
Pancake syrup

**To make more, simply double all ingredients.

To make the dough, mix the pancake mix with the milk and vanilla until creamy with a whisk. Add the flour to add texture and stability to the mix (you’ll thank me later when frying). If still liquid, add 1/4 cup more.

Note that you can add whatever you like in the dough for flavor, like caramel or fruit, as long they’re not too hard.

Once the dough’s ready (should be easy to mold and shape), dust some flour on your hands and a dessert spoon. Use the spoon to scoop out some dough and use your hands to make them into little balls.

Heat the oil in a saucepan (recipe works with a deep fryer as well!). Fry up those puffs until crisp and golden on the outside; they'll be soft and fluffy on the inside.

Enjoy and remember to share the fluffy goodness!

*Pancake Puppies ® Denny's*
Note: The puppies are actually known as malasadas, a type of Portuguese donuts

LinkWithin

Related Posts with Thumbnails